Category: Uncategorized

  • Microfiber Cloth Edges: Serged, Piped, or Laser-Cut — and When to Use Each

    Microfiber Cloth Edges: Serged, Piped, or Laser-Cut — and When to Use Each

    Most microfiber buying decisions focus on the middle of the cloth — the GSM, the fiber blend, the surface finish. But the part that most often determines whether a cloth looks sharp on day one and still works on day fifty is the perimeter. The edge decides whether the cloth frays, whether it can safely touch a lens or a coated screen, whether a printed design can run all the way to the border, and a surprising share of the unit cost. It is a real construction choice, separate from the pile and the weight, and it deserves its own decision.

    The edge does more work than it looks

    A raw-cut microfiber edge left untreated will shed fibers and unravel in the wash, so every finished cloth resolves the edge one of two ways: it either stitches the border closed with thread or fabric, or it seals the cut itself with heat. That single fork drives most of the trade-offs that follow. Stitched edges tend to be tougher and cheaper but add material at the border; sealed edges are cleaner and gentler but rely on the seal holding up. Knowing which family a cloth belongs to tells you most of what you need before you read another spec.

    Stitched edges: overlock and piping

    Overlock, or serged, is the workhorse: polyester thread sewn around the border hundreds of times to lock the fibers in place. It is the most common and most economical finish, and it resists fraying extremely well, which is why general-purpose cleaning cloths almost always wear it. The catch is that the raised thread border is harder than the microfiber around it, so a serged edge can leave micro-scratches on truly delicate surfaces like camera lenses, eyeglasses, or freshly coated automotive paint. For a rag that wipes counters and equipment, that is a non-issue; for a cloth that touches optics, it matters.

    Piped or banded edges wrap a thin strip of fabric around the border and sew it in. The band seals the edge against fraying and can look more finished, and how gentle it is depends entirely on the trim material: a soft microfiber band is kinder to surfaces than a stiffer polyester satin one. The trade-off is that the cloth’s absorbency is slightly interrupted where the band sits, so the very edge does less cleaning work than the field of the cloth.

    Cut edges: laser, heat, and ultrasonic

    Sealed edges skip thread entirely. A laser or heat cut melts the polyester as it cuts, fusing the border so it cannot unravel, and because there is no stitching and no added material, the cloth has a clean, flush perimeter that is gentle on fine finishes and lets a printed design bleed all the way to the edge. Ultrasonic cutting takes the same idea further, using a blade vibrating at high frequency that seals with minimal heat and holds a very tight dimensional tolerance. Detailers and optical suppliers tend to prefer these edgeless cloths precisely because there is no border material to drag across a sensitive surface.

    The honest limitation of cut edges is longevity under abuse. A sealed border is thinner than a serged one, and on higher-GSM cloths that get worked hard the seal can eventually start to separate at a corner. A hidden or two-ply edge answers that by tucking the border inside a doubled construction, combining the scratch-safety of an edgeless cloth with more of a stitched edge’s durability — at the cost of a heavier, pricier cloth.

    Why cut consistency matters for printed cloths

    If you are ordering custom-printed cloths, the cutting method affects more than fraying — it affects whether every piece in the run finishes at the same size. Sealed cutting is far more precise than cutting by hand, and that precision is what keeps a full-bleed design registered to the same border on every cloth instead of drifting a few millimeters piece to piece.
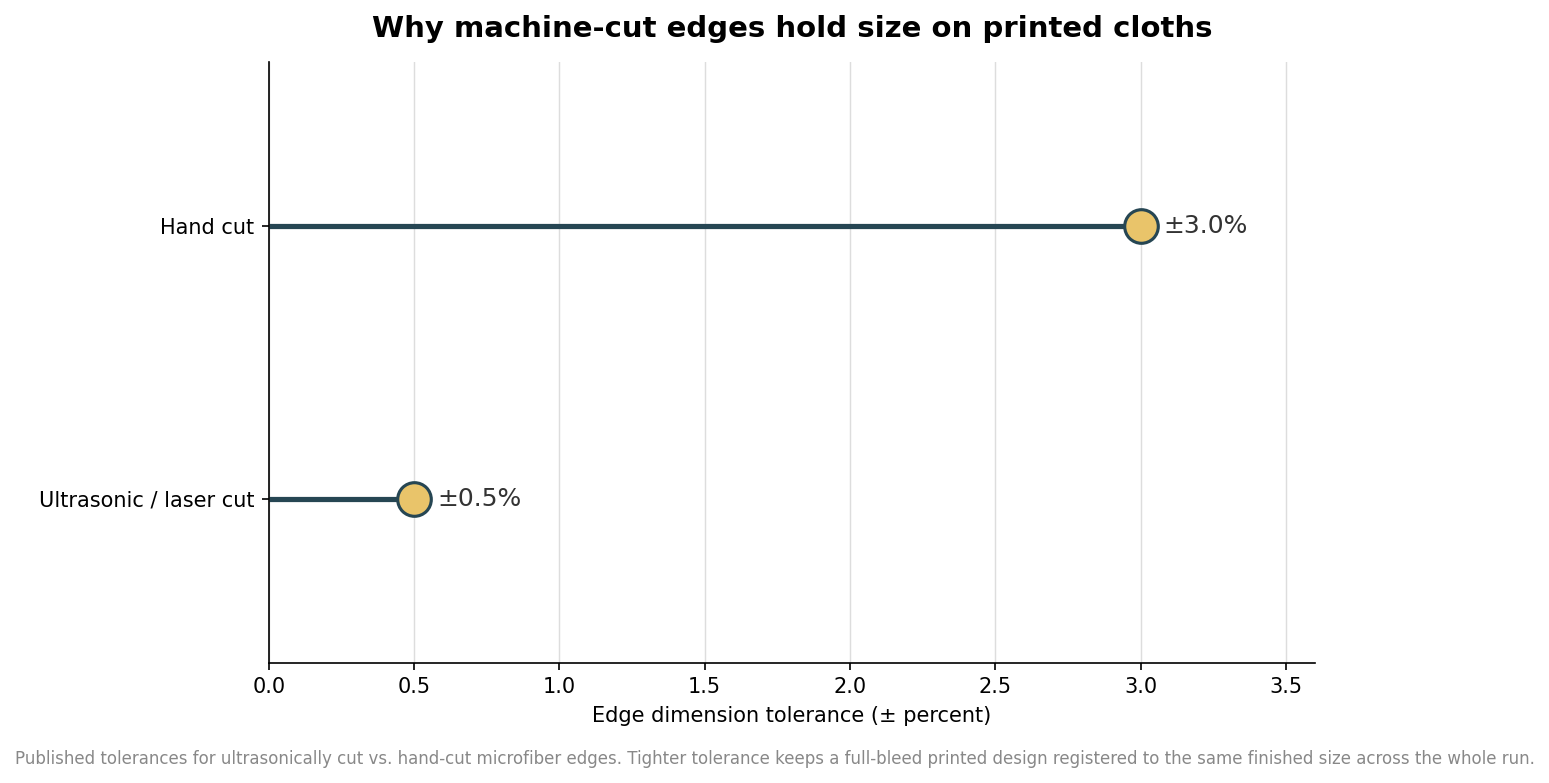
    Lollipop chart comparing edge dimension tolerance of ultrasonic or laser cutting at plus or minus half a percent versus hand cutting at plus or minus three percent
    Machine-sealed cutting holds a much tighter finished-size tolerance than hand cutting, keeping full-bleed prints registered across the run.

    That difference is easy to overlook on a single sample and obvious across a few thousand units. When the artwork runs edge to edge, a loose tolerance shows up as uneven margins and clipped logos; a tight one keeps the print sitting exactly where the proof promised. For lens cloths and promotional cloths where the graphic is the product, machine-sealed edges are usually the right call for that reason alone.

    Matching the edge to the cloth’s job

    Put the finishes side by side against the two things that matter most for your use: how much fraying abuse the cloth will take, and whether it has to be gentle on a delicate surface. The comparison below summarizes where each finish lands.
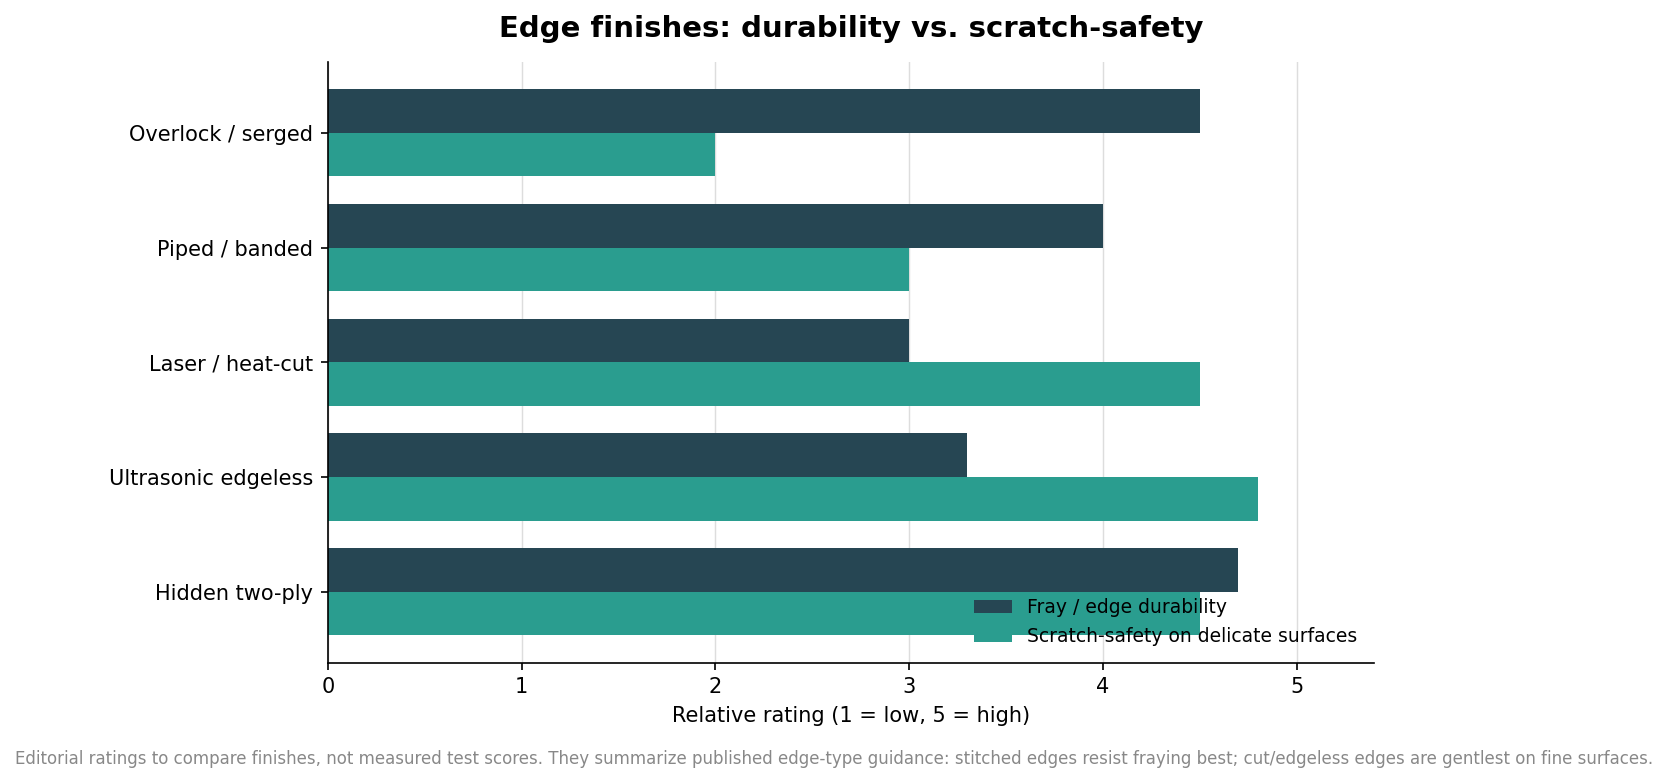
    Grouped bar chart rating microfiber edge finishes on fray durability and scratch-safety, with serged strongest on durability and edgeless strongest on scratch-safety
    Editorial comparison of edge finishes: stitched edges win on fray durability, cut and edgeless edges win on scratch-safety.

    The pattern is consistent. If the cloth is a durable cleaning tool that will be laundered hard, a serged edge gives the most fray resistance for the least money. If it will touch lenses, screens, or fine paint, an edgeless laser or ultrasonic edge removes the border that would otherwise scratch. If you need both toughness and surface-safety, a hidden two-ply edge splits the difference. And if the cloth is a printed giveaway where the design runs to the border, the clean, tightly cut edge is what makes the graphic look intentional.

    Whichever edge you choose, confirm it on a real production sample and put it through several wash cycles before committing, since fraying and seal separation only show up after laundering, not on the first wipe. Match the edge to the job the way you already match GSM and fiber, and the cloth will still look and work the way you intended long after the first box is opened.
  • Which Microfiber Cloth for Which Job: A Use-Case Guide

    Which Microfiber Cloth for Which Job: A Use-Case Guide

    The most common mistake in ordering microfiber is treating every cloth as interchangeable. A cloth that cleans a phone screen without a streak is the wrong tool for drying a car, and a plush towel built to hold water will smear a camera lens. Weight and weave are what separate them, and both track closely to the job. This is a use-case guide: pick the surface you actually need to clean, and let that decide the fabric weight, the weave, and the size before you think about branding. Get those three right and a cloth cleans better and lasts longer; get them wrong and no amount of quality in the fiber will save the result.

    Lens and screen: the lightest, tightest cloth

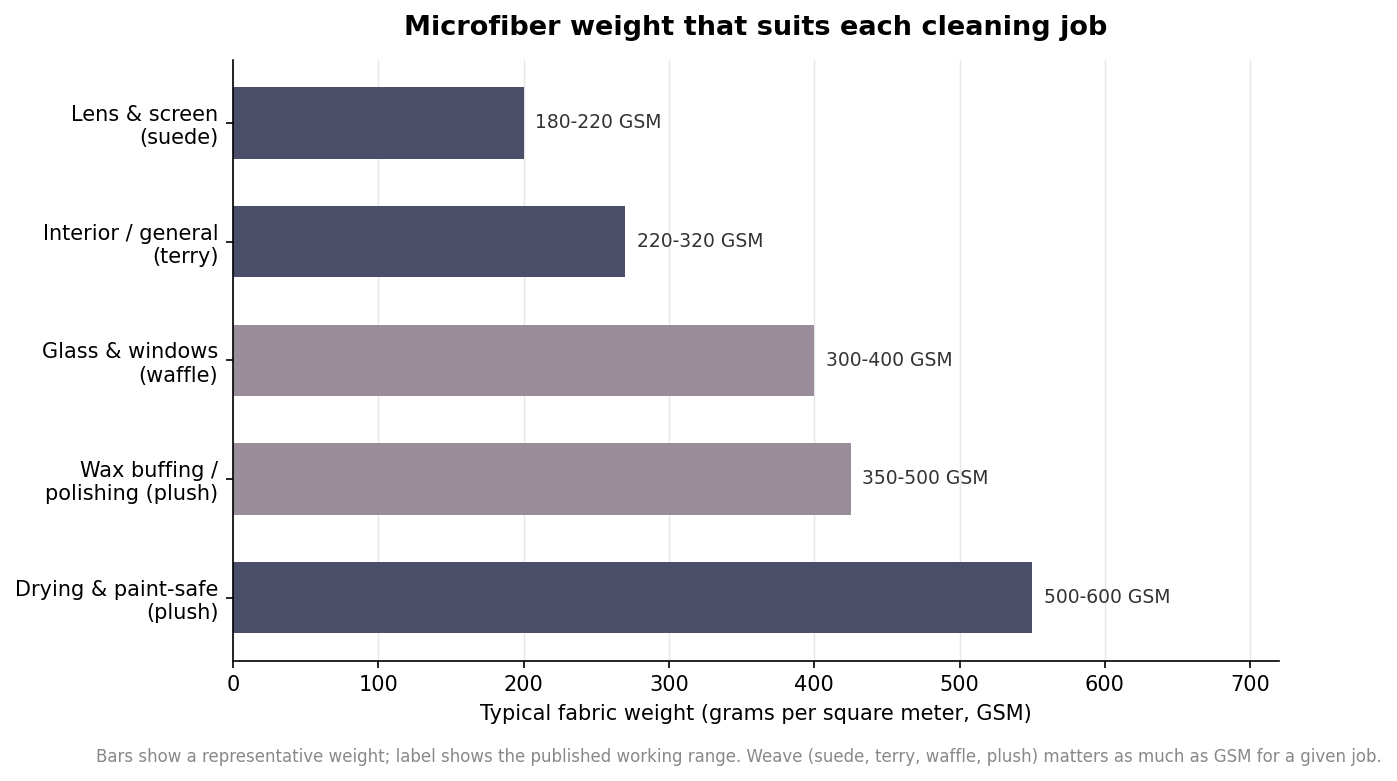
    Eyeglasses, camera lenses, and phone or tablet screens need the gentlest cloth in the catalog. The right choice is a suede-finish microfiber around 180 to 220 GSM, woven flat and tight rather than fluffy. The tight face lifts oil and fingerprints without dragging grit across a coated surface, which is exactly what a plush towel would do. These cloths are small by design, commonly 6 by 6 or 8 by 8 inches, because the job is precision wiping, not covering area. This is also the workhorse of promotional microfiber: a printed suede lens cloth is cheap, useful, and lives in a glasses case or laptop bag for years, so the branding gets seen far longer than most giveaways. If you are ordering cloths to hand out, this is almost always the format you want.

    Everyday interior and general wiping

    For dashboards, trim, counters, and general-purpose wiping, step up to a terry-weave cloth in the 220 to 320 GSM range. This is the versatile middle of the market: absorbent enough to handle spills and cleaning product, durable enough to survive frequent laundering, and cheap enough to deploy in volume. A 220 GSM cloth suits high-turnover professional use where towels are consumed quickly, while 300 to 320 GSM gives a plusher hand for interior detailing and screens on the same cloth. If you only order one weight for mixed daily use, this band is the safest single choice, which is why it dominates bulk cleaning inventories. Size and edge finish are the two details to lock down here. General cloths commonly run 12 by 12 up to 16 by 16 inches, and the edge matters more than it looks: a laser-cut, edgeless cloth has no stitched border to scratch a surface or trap grime, while a stitched hem is more durable through hundreds of wash cycles but adds a hard perimeter you keep off delicate finishes. Pick edgeless for anything glossy and stitched for rough utility work.

    Glass and windows: why waffle wins

    Glass is the one job where weave matters more than raw weight. A waffle-weave cloth, typically around 300 to 400 GSM, has a gridded surface that traps moisture and product residue inside its cells instead of pushing them around the glass, which is what leaves streaks. A flat or plush cloth of the same weight will smear where a waffle weave wipes clean. Reserve a dedicated set for glass and mirrors, keep them out of the wax and polish rotation so they never pick up oily residue, and they will out-clean a general cloth every time. This is the clearest case for matching weave to task rather than defaulting to whatever is on hand.

    Horizontal bar chart of representative microfiber GSM for lens, interior, glass, polishing, and drying jobs with published working ranges labeled
    Fabric weight climbs from light suede lens cloths to dense plush drying towels; each job has a working GSM band.

    Polishing, buffing, and drying: the heavyweights

    The heavy end of the range is built to be soft against delicate finishes and to hold liquid. Wax and sealant buffing calls for a plush cloth in the 350 to 500 GSM range, often dual-sided, with fluffy fibers on one face for gentle buffing and a flatter face for precise product removal. Drying and paint-safe work climbs higher still, to 500 to 600 GSM and beyond, where dense, ultra-fluffy fibers create a cushion between the cloth and a clear coat so heavy passes do not risk micro-scratching. These cloths also run larger, with drying towels commonly reaching 16 by 24 inches or more so a single pass covers a panel and holds the water it lifts. They are the most expensive cloths per unit and the least suited to rough utility work, so buy them for the finishes that justify the care, launder them separately from your general cloths, and keep them out of everyday cleaning duty where grit would shorten their life.

    Blend and quality: reading past the label

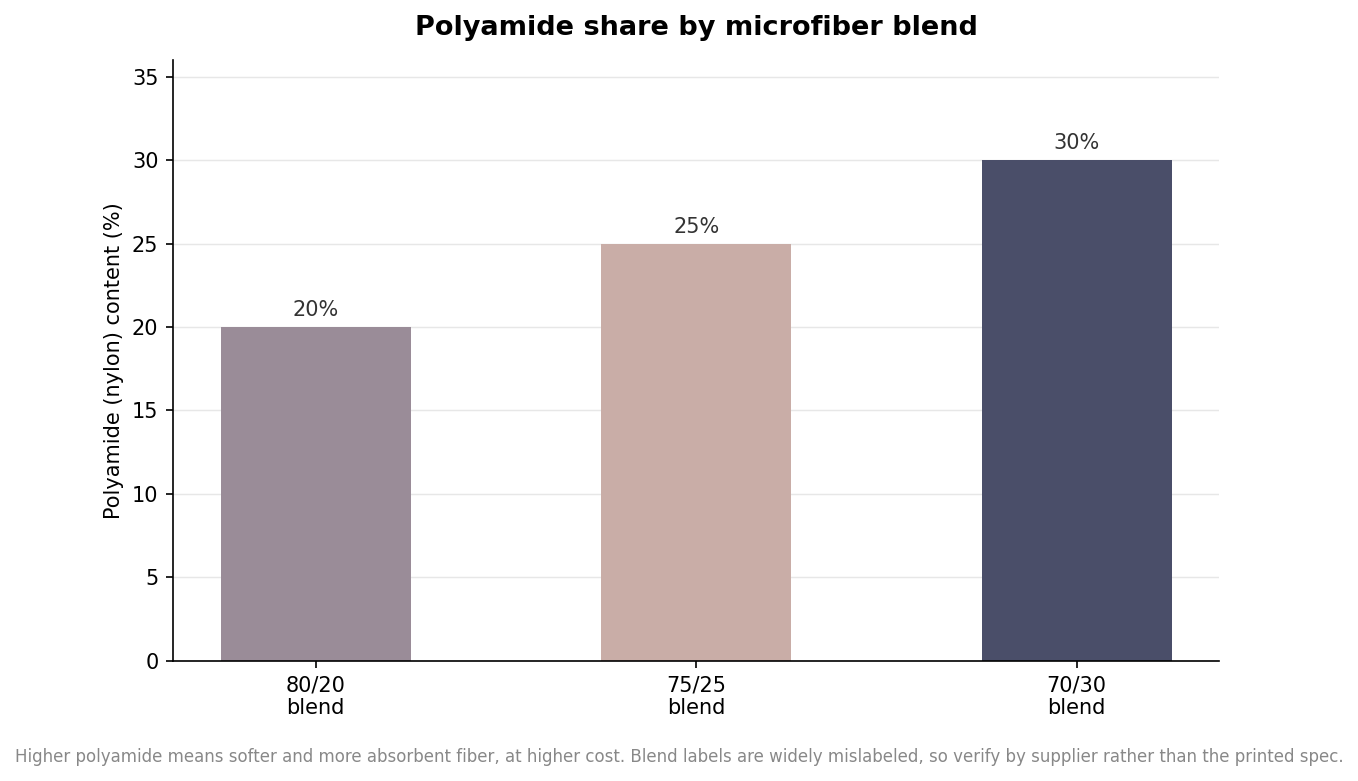
    Two cloths at the same GSM can perform very differently because of their fiber blend. Microfiber is a polyester and polyamide mix, and the ratio, printed as 80/20, 75/25, or 70/30, tells you the polyamide share. Polyester does the scrubbing; polyamide brings softness and absorbency, so a 70/30 cloth is softer and thirstier than an 80/20 at the same weight, and it costs more because polyamide is the pricier fiber. The catch is that these labels are widely unreliable. Independent testing has found cloths marked 80/20 that were effectively all polyester, and the same factory output relabeled from 80/20 to 70/30 downstream. The practical takeaway is to judge by a physical sample and a consistent supplier rather than the printed spec: a genuine higher-polyamide cloth grabs slightly at dry skin and sheds no lint, while a mislabeled one feels slick and lifeless. When you match weight and weave to the job and then verify blend by hand, you get a cloth that does what the order sheet promised.

    Bar chart of polyamide percentage in 80/20, 75/25, and 70/30 microfiber blends
    Higher polyamide content means a softer, more absorbent cloth at higher cost, but printed blend labels are often unreliable.
  • Why the Same Artwork Prints Differently on Two Microfiber Cloths

    Two cloths, one file, two different results. The explanation is in the blend rather than in the press.

    How sublimation actually works

    The dye turns to gas under heat and bonds inside the polyester filament itself.

    There is no ink layer on the surface, which is why the print cannot crack or peel.

    Polyamide does not take the dye

    It stays lighter, so a 70/30 blend renders the same file softer than an 80/20 does.

    The effect is most visible in deep solids and least visible in light, airy artwork.

    Which blend to pick

    Choose the higher polyester content when the cloth is carrying a brand mark for display.

    Choose the higher polyamide when the cloth will genuinely be used to clean every day.

    Designing for the softer render

    Increase contrast rather than saturation, and avoid relying on a single deep solid.

    We proof on the actual blend before the run, so nobody is surprised by the first carton.

  • Why Your Microfiber Cloths Stopped Working

    A cloth that is visibly worn out is rare. A cloth that looks new and cleans like a paper towel is extremely common, and the cause is usually in the wash.

    Fabric softener is the main culprit

    Softener works by depositing a lubricating film, which is the exact opposite of what a split fibre needs.

    The film fills the capillary space between the fibres, so nothing is lifted or held.

    Dryer sheets do the same thing

    They are softener on a carrier sheet, applied under heat, which makes it worse.

    Air dry, or tumble on low with nothing else in the drum.

    Cotton lint is the second killer

    Microfibre grabs lint and holds it, so a mixed wash loads the cloth with cotton fibres.

    Wash microfibre separately. It is the single easiest habit to fix.

    Heat and bleach

    High heat can melt and fuse the split ends, which permanently flattens the cleaning edge.

    Bleach attacks the polyamide. Neither damage is reversible.

    Can a clogged cloth be saved?

    Sometimes: a hot wash with detergent and no softener, repeated, strips some of the film.

    Prevention is far cheaper, which is why we print the care rules on the packaging.

  • The Complete Buyer’s Guide to Custom Microfiber Cloths

    Every microfibre cloth in the world is sold under one word, and that word describes none of the four things that decide whether it works.

    Is the filament split?

    Split fibre has wedge edges that lift residue; unsplit fibre is fine polyester that smears.

    Drag it dry across a dry palm. Split grabs. Unsplit slides. That is the whole test.

    What is the blend ratio?

    Polyester gives the scrubbing edge, polyamide gives absorbency and grab.

    80/20 is the standard, 70/30 is plusher and holds more, and both should be on the quote.

    What is the GSM?

    Weight is density of pile: 300 for glass and screens, 400 to 500 for drying and buffing.

    A cloth with no stated GSM has not been specified, whatever else the listing says.

    How is the edge finished?

    Laser cut or ultrasonic weld for lenses and paint, because there is no thread to drag.

    Serged edges are fine for wheels, engine bays and general cleaning, and nowhere else.

    And check the weave against the surface

    Flat microsuede for optics, terry pile for absorbency, waffle for streak-free glass.

  • How to Specify Printing on Custom Microfiber Cloths

    How to Specify Printing on Custom Microfiber Cloths

    The material decisions on a custom microfiber cloth — weight, weave, edge finish — get most of the attention, but the choice that surprises buyers most often is how the artwork actually gets onto the cloth. Microfiber behaves nothing like a cotton tee or a paper coaster, and the print method you pick quietly sets the rules for everything else: which cloth colors you can use, whether your logo can be photographic or has to be flat spot color, how low your order can go, and how long production takes. Settling that decision at the start of a quote saves a round of surprised emails later.

    Start with the fiber: microfiber is a sublimation-first material

    Almost all cleaning microfiber is polyester, or a polyester-polyamide blend, and polyester is the one fiber that dye sublimation was built for. In sublimation the printer lays your design in reverse onto a transfer paper, then heat and pressure turn the solid dye into a gas that bonds directly into the polyester fibers. The color becomes part of the cloth rather than a layer sitting on top of it. That distinction matters for a cleaning product specifically: a surface ink film can glaze over the fibers and blunt the very texture that lets microfiber lift dust and smears. Because the sublimated dye penetrates instead of coating, even a full-coverage print leaves the cloth working the way an unprinted one does. It is also why sublimation is the default for full-color and photographic artwork — the process lays down all colors in a single pass with no separate screen per color, so gradients, photos, and complex logos cost no more to print than a one-color mark.

    The catch is contrast. Sublimation only shows up well on white or light cloths, and it cannot print white at all — anywhere your design is meant to be white, what you actually get is the base color of the cloth showing through. If your brand mark is white on a dark background, sublimating it onto a dark microfiber will not reproduce it. The usual fix is to print the art on a white or light-grey cloth and let the fabric itself read as the light part of the design.

    When screen printing or a woven option still makes sense

    Screen printing lays ink on the surface, one screen per color. On microfiber that carries two consequences worth weighing. First, it can print opaque colors — including white — on dark cloths, which is exactly what sublimation cannot do, so a white logo on a black or navy cloth is a screen-print or heat-transfer job by definition. Second, the cured ink sits on top of the fibers, so within the printed area the cloth loses some of its softness and absorbency. For a small logo in one corner that is a non-issue; for a large graphic covering a lens cloth it can matter. Screen printing also carries a setup cost per color, so a one- or two-color mark stays economical while a full-color photograph becomes impractical.

    Two other routes come up. Heat-applied transfers behave much like a screen print for these purposes — good for white or spot-color marks on dark cloths, and a film on the surface. And for a premium, tactile finish some buyers add a woven or embroidered patch, or a printed care-label style tag, rather than decorating the cloth face at all, which keeps the entire cleaning surface intact. Each of these is a legitimate answer. The point is to pick the one whose trade-offs you can live with before anyone approves artwork.

    Specify the artwork so it survives the method

    Match the art to the method, not the other way around. If you are sublimating, build the design on a light background, drop any element that relies on white ink, and keep small text a touch heavier than you would for paper, because very fine lines can soften slightly as the dye spreads into the fibers. If you are screen printing, count your colors — every additional spot color is another screen and another setup charge — and convert your logo to the specific spot colors you want rather than leaving it as a photo. In both cases supply vector artwork where you can, confirm whether the print runs one side or two, and ask for the maximum imprint area at the cloth size you chose, since decoration rarely runs edge to edge.

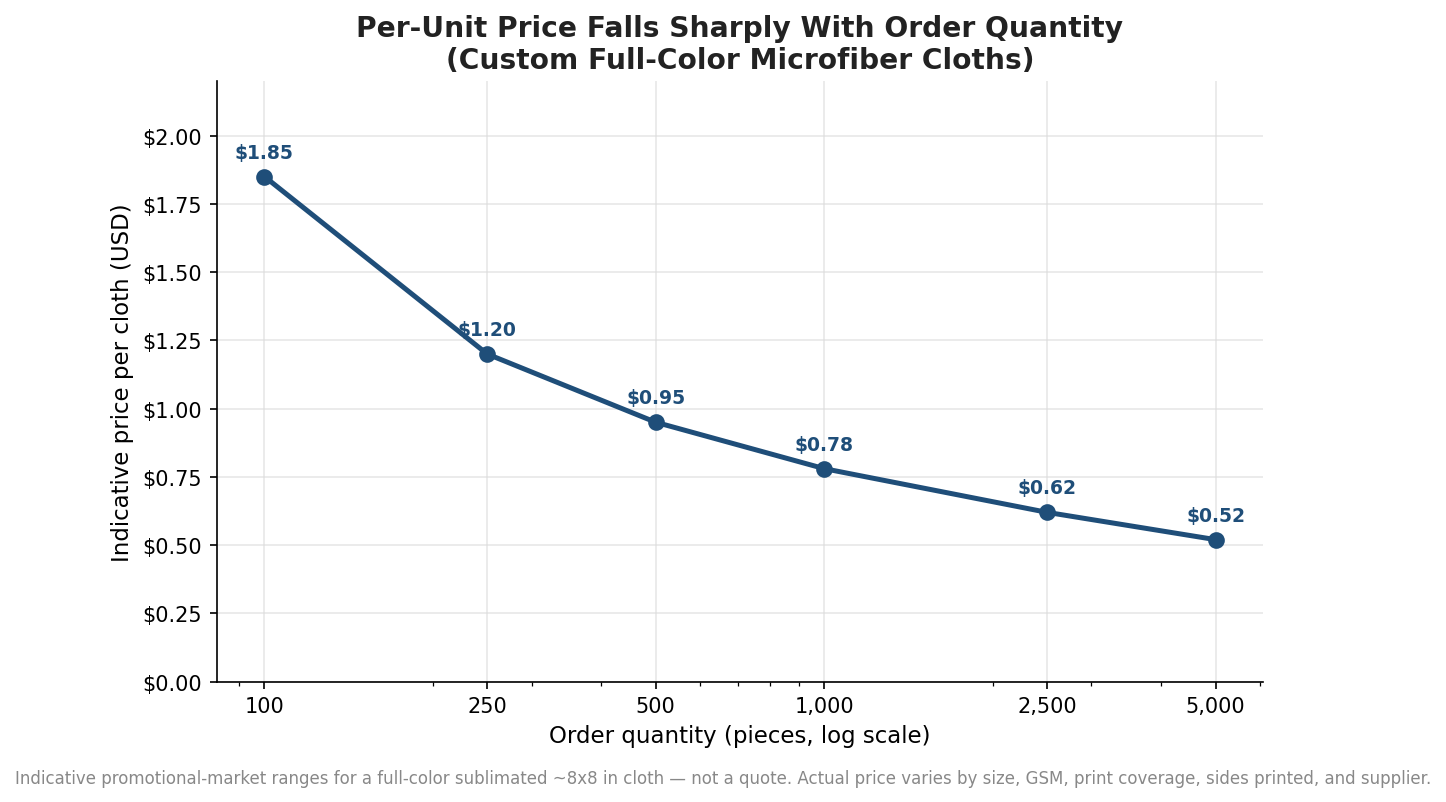
    Line chart showing indicative per-unit price for custom full-color microfiber cloths falling from $1.85 at 100 pieces to $0.52 at 5,000 pieces
    Per-unit price drops steeply as quantity rises; the biggest savings come in the first few hundred pieces.

    Quantities, setup, and where the price breaks fall

    Minimums for custom microfiber vary more than most buyers expect. Full-color sublimated cloths are often available at low or even no minimum through digital, print-on-demand suppliers, while promotional-catalog programs commonly set floors somewhere around 75 to 250 pieces depending on the style and edge finish. Per-unit pricing across the promotional market runs roughly from under $0.50 for large-quantity budget cloths to around $3.50 or more for small runs of larger, heavier, two-sided prints. The clearest pattern is the volume curve: bulk orders in the 250-and-up range frequently land under a dollar a piece, and the per-unit cost keeps easing as you push into the thousands. Screen-printed jobs load their setup cost up front, so at low quantities a one-color screen print and a full-color sublimation can price surprisingly close, with sublimation pulling ahead on value once the artwork has more than a color or two. Treat the figures here as indicative of the market rather than a specific quote — size, GSM, print coverage, and supplier all move the number.

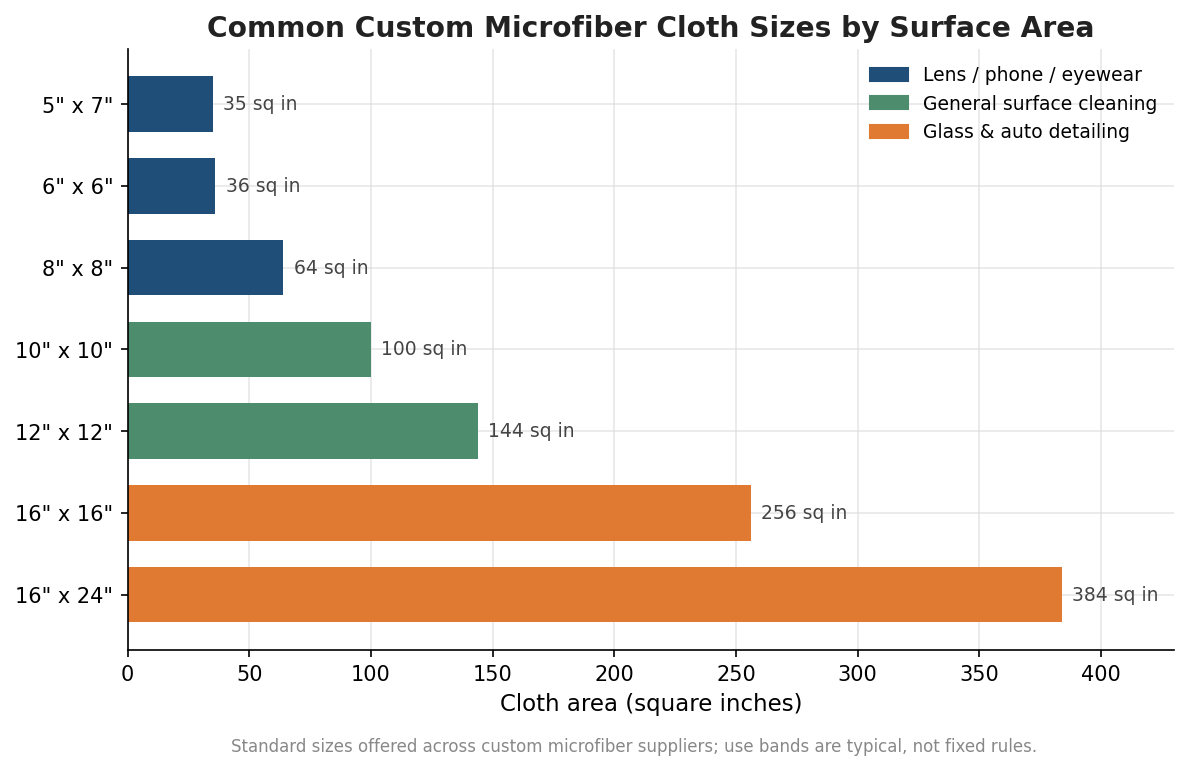
    Horizontal bar chart of common custom microfiber cloth sizes by surface area, from 5x7 inches at 35 square inches to 16x24 inches at 384 square inches
    Common stock sizes range from small eyewear cloths to large detailing towels, grouped by typical use.

    Build the timeline backward from proofing

    Standard production for decorated microfiber typically runs somewhere in the three-to-fifteen business day range once artwork is approved, with rush tiers — including one- to three-day options on some stock styles — available at a premium. The step buyers underestimate is proofing. Ask for a digital proof, and if color fidelity matters to your brand, a physical pre-production sample, because sublimated color on textured polyester can read a little differently than the same file does on a screen or on paper. If the cloths are tied to an event or a product launch, work backward: event date, shipping transit, production window, then proof approval, and give that proof step real room. A day spent confirming that a light-grey cloth reproduces your logo the way you expect is far cheaper than reprinting a few thousand pieces.

    None of these methods is universally best. The right specification falls out of two questions answered honestly up front: what colors does the artwork actually need, and what color is the cloth going to be. Answer those, and the method, the minimum, and most of the cost picture follow on their own.

  • Custom Microfiber Cloths: How to Judge GSM, Fiber, and Finish

    Custom Microfiber Cloths: How to Judge GSM, Fiber, and Finish

    Microfiber all looks the same in a photo, which is exactly why buyers get burned. Two cloths at the same price and the same size can behave nothing alike: one lifts fingerprints off a lens in a single dry pass, the other pushes the oil around and leaves lint behind. The difference lives in a handful of specifications that rarely make it onto a product listing. If you are ordering custom microfiber cloths, whether as lens wipes to hand out or cleaning cloths to sell, knowing those specs is the difference between a cloth people keep and one they toss.

    GSM is the first number that matters

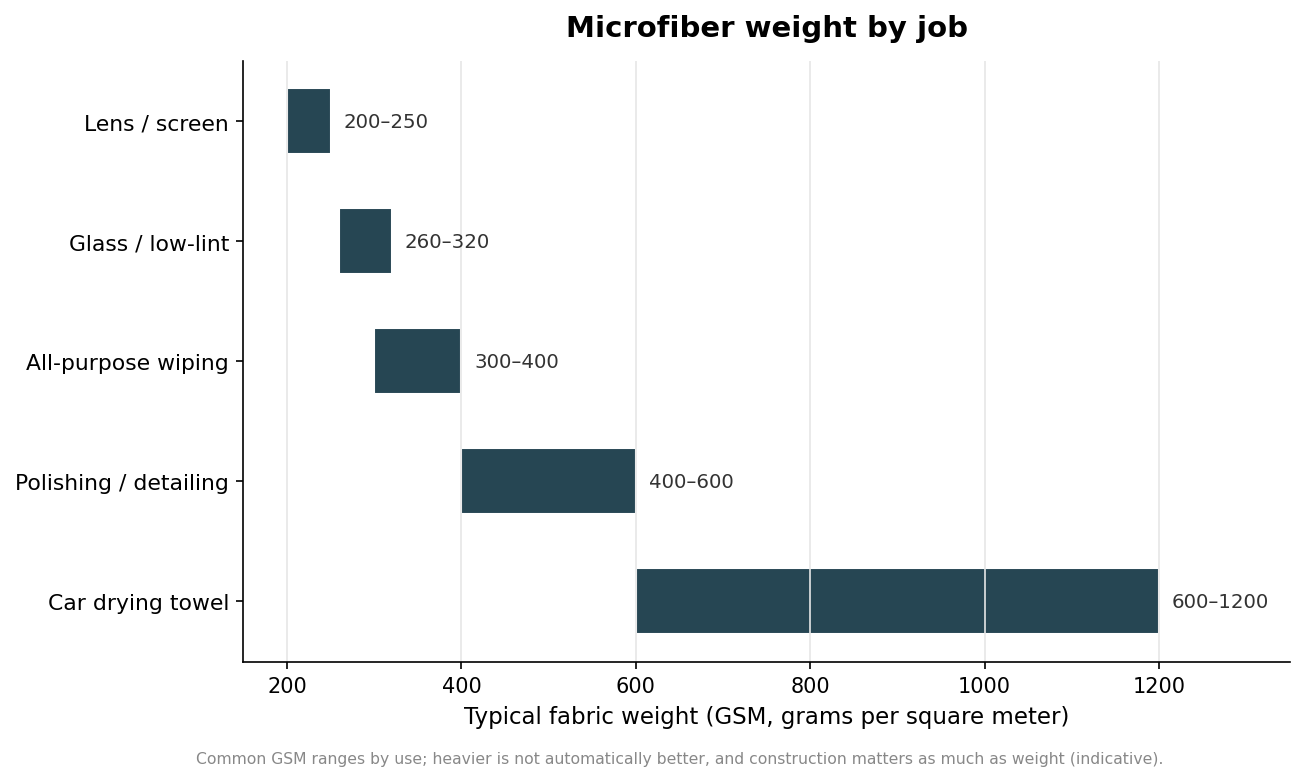
    GSM, or grams per square meter, measures the fabric’s weight and roughly tracks its thickness and absorbency. It is the fastest way to sort a cloth to its job, even though it is not a quality score on its own. Thin cloths in the 200 to 250 GSM range are built for screens, lenses, and eyeglasses, where a light, fast-drying wipe is the goal. Move up to 260 to 320 GSM for glass and general low-lint cleaning, 300 to 400 for all-purpose dusting and damp wiping, and 400 to 600 for softer polishing and detailing. Heavy drying towels for cars climb well past 600 and can reach 1200 or more.

    The common mistake is treating heavier as better. A 600 GSM plush towel is wrong for eyeglasses, where it is bulky and slow, just as a 220 GSM lens cloth is wrong for drying a car hood. Pick the weight for the surface first, then judge everything else within that band. A promotional lens cloth and a kitchen cloth are different products that happen to share a fiber.

    Horizontal range chart of typical microfiber GSM weights by use, from lens cloths to car drying towels
    Match the fabric weight to the surface before comparing anything else.

    The blend: polyester scrubs, polyamide grabs

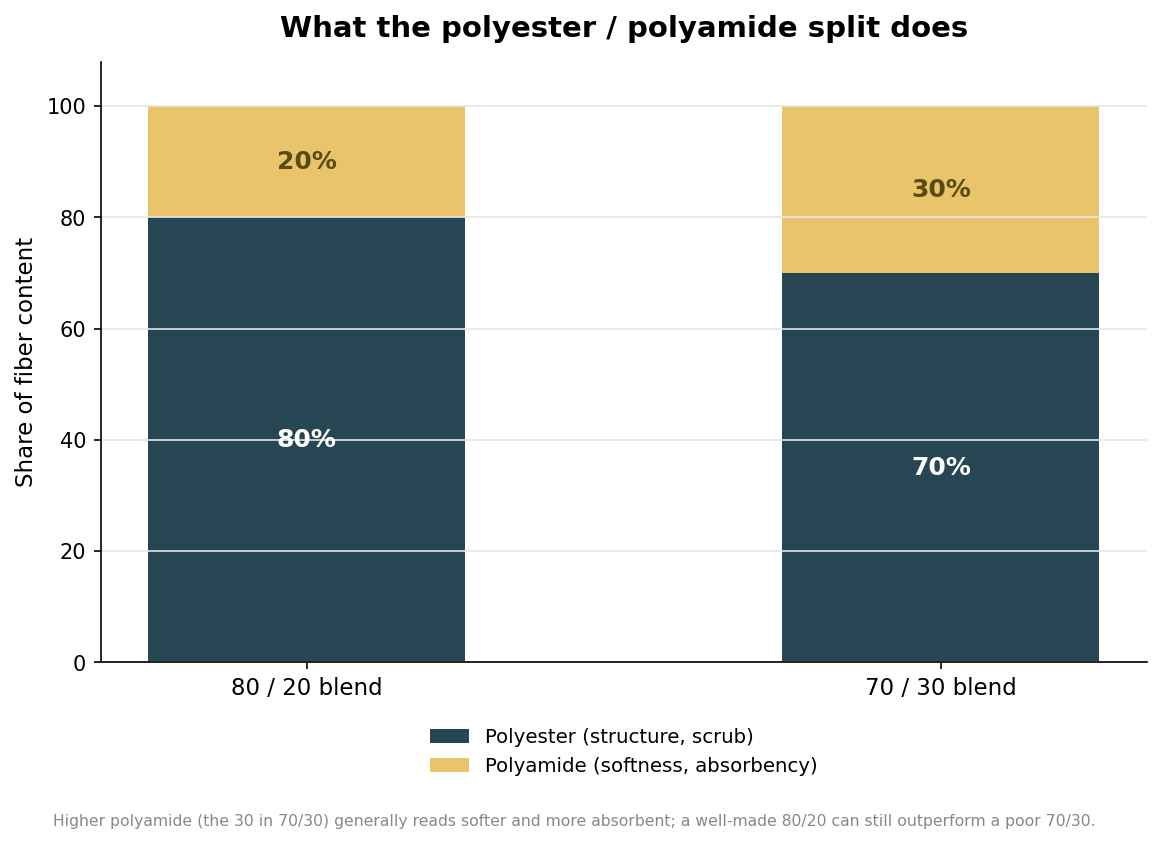
    Microfiber is a blend of polyester and polyamide, and the ratio tells you what the cloth is tuned for. Polyester, the larger number, supplies structure, durability, and scrubbing bite. Polyamide, the smaller number, adds softness and boosts absorbency. The two ratios you will see most are 80/20 and 70/30. A 70/30 cloth usually feels softer and more absorbent, which suits delicate surfaces like coated glass and automotive paint, while 80/20 is a common, capable all-rounder.

    Do not read the ratio as a verdict, though. A well-engineered 80/20 glass cloth can outperform a poorly made 70/30, because weave and fiber splitting matter at least as much as the blend on paper. Treat the ratio as one input among several rather than a headline stat, and be wary of listings that advertise the blend but stay silent on everything else.

    Stacked bar chart comparing 80/20 and 70/30 polyester-polyamide microfiber blends
    The polyamide share drives softness and absorbency; polyester drives structure and scrub.

    Split fiber is where cheap and good part ways

    The single biggest quality divide is whether the fibers are split. Splitting the fiber during manufacture multiplies its surface area and the number of contact points that grab dust, oil, water, and fingerprints. A properly split cloth feels faintly grippy on clean glass and lifts marks; a poorly split one feels slippery, slides across the surface without picking anything up, and can smear oil or shed lint. That tactile grip is the tell, and it is invisible in a product photo.

    There is a simple field test. On a clean, dry pane of glass or a screen, a good microfiber should catch very slightly and reduce or remove a fingerprint with no liquid at all. A cloth that glides frictionlessly and leaves the smudge is under-split, whatever its GSM or blend claims. When you evaluate samples before a custom run, run this test rather than trusting the spec sheet alone.

    Edges, size, and fiber fineness

    The edge finish decides whether a cloth is safe on your most delicate surface. Overlock or serged edges have a stitched border that is fine for general cleaning but can scratch coated screens and paint. Ultrasonically cut edgeless cloths have no stitched border and are preferred for final polishing, coated glass, and car paint. Hard, rough stitching should be avoided on high-gloss and coated surfaces entirely. For a lens or screen cloth, an edgeless or soft-edge finish is usually worth specifying.

    Size and denier round out the picture. Pocket lens cloths commonly run around six by seven inches, general cleaning cloths around twelve by twelve or sixteen by sixteen. Denier measures the fineness of each strand, and microfiber is defined as finer than one denier; strands in the 0.2 to 0.5 range capture finer particles than a coarser one-denier fiber of the same weight. As with GSM, denier is a useful input, not a standalone promise, since construction still governs how the finished cloth performs.

    Specifying a custom cloth without guesswork

    Putting it together, a clean custom order names the job first and lets the job drive the specs. Decide the surface and pull the GSM band from it, choose a blend and confirm the fiber is well split, set the size, and pick an edge finish that matches the most delicate thing the cloth will touch. For a giveaway lens cloth that might read as a light 220 to 240 GSM, edgeless, split-fiber cloth around six by seven inches; for a resale cleaning cloth, a heavier 300-plus GSM square with a serged edge.

    Decoration is the last layer, not the first. Full-color artwork is typically applied by dye sublimation, which bonds the ink into the fibers and holds up to washing, while simpler solid logos can be screen printed; the lighter, poly-heavy lens weights take sublimation especially well. Confirm the printing method and a wash-durability expectation with your supplier, and treat weights, sizes, and blends here as indicative starting points to verify against actual samples before committing to a run.

  • Hello world!

    Welcome to WordPress. This is your first post. Edit or delete it, then start writing!